
Gimp: Fumetti a colori: come funziona
Se vuoi colorare rapidamente fumetti, caricature o disegni monocromatici, hai un buon strumento a portata di mano con "GIMP". Il software open source viene fornito con vari strumenti per dare colore al foglio. Leggi qui come passare dal disegno in bianco e nero all'immagine a colori finita.
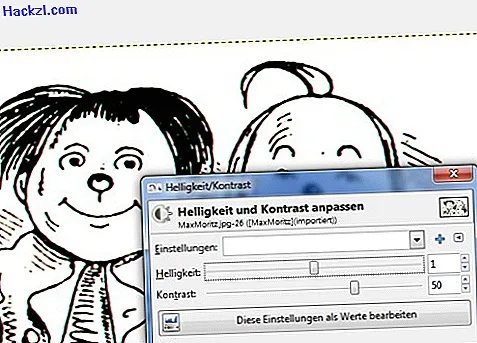
Preparazione: l'originale in bianco e nero
L'immagine originale dovrebbe essere in bianco e nero puro. I disegni acquisiti spesso presentano ancora macchie di colore. Puoi rimuoverli aumentando il contrasto dell'immagine. Puoi farlo tramite il menu »Colori« -> »Luminosità / Contrasto« usando il cursore o puoi regolare i valori di colore tramite »Colori« -> »Curve«.
Ecco come il colore entra nel fumetto: colora strato per strato con GIMP
Salvare il disegno iniziale ottimizzato in formato GIMP .xcf in modo da poter lavorare con diversi livelli come segue:
- Innanzitutto, separa il disegno reale dallo sfondo. Per fare ciò, apri il menu "Colori" e seleziona "Colori per trasparenza". Nella seguente finestra di dialogo, confermare che lo sfondo bianco deve essere sostituito dalla trasparenza.
- Infine, crea un nuovo livello di sfondo bianco usando la finestra del livello o la voce di menu »Livelli« -> »Nuovo livello«. GIMP suggerisce già i valori giusti per te.
- Ha senso creare un livello separato per ogni gruppo di elementi. Basta duplicare il livello trasparente tutte le volte che è necessario. Il modo più rapido per farlo è utilizzare la scorciatoia da tastiera MAIUSC + CTRL + D, che viene utilizzata per duplicare il livello attivo (evidenziato in blu nella finestra di dialogo del livello). Per Max e Moritz nell'esempio, questi erano quattro livelli: sfondo, viso, capelli, vestiti.

Prendi un secchio di vernice e un pennello!
- Il modo più veloce per colorare aree chiuse come lo sfondo o le facce nell'esempio è con lo strumento "Riempi" (icona del secchio di vernice). È importante selezionare "Dietro" come modalità di riempimento in modo da mantenere i contorni della caricatura o del disegno. È possibile selezionare il colore facendo clic sulle aree di colore sotto la casella degli strumenti.
- Il modo migliore per colorare aree più piccole è usare lo strumento pennello. Scegli una dimensione del pennello adatta e assicurati che "Dietro" sia attivato come modalità colore. Se lavori solo su un livello alla volta, non importa se il colore si esaurisce dai contorni: con lo strumento "Gomma" puoi rimuoverlo rapidamente.
- Se vuoi colorare disegni o manga differenziati, dovresti anche impostare gli accenti in aree di colore come ombre o effetti di luce. Per questo c'è lo strumento "Dodge / Postexpose" in GIMP. Puoi trovarlo nel menu sotto "Strumenti" -> "Strumenti di pittura" o attivarlo con la scorciatoia da tastiera MAIUSC + D.
- Salva sempre il lavoro finito in formato XCF in modo da poter apportare rapidamente modifiche in seguito. GIMP supporta anche tutti i formati di immagine più comuni. Se si desidera salvare il file in formato JPG o PNG, è necessario accedere alla voce di menu »File« → »Esporta«.
Max e Moritz erano colorati con GIMP versione 2.8.6. GIMP è un programma di editing di immagini gratuito ma potente che (quasi) si avvicina a "Photoshop". Puoi trovare esempi di attività interessanti che puoi padroneggiare con successo con GIMP nei nostri consigli pratici.